
Can and Canless Downlights, Planned to a Layout
Recessed lighting is a layout job before it is a wiring job. Spacing, aperture size, beam angle, and color temperature decide how a room reads, and California’s energy code decides which fixtures and controls are allowed in it. PowerRoute plans the layout, sizes the circuit, installs airtight IC-rated housings or canless wafers, and sets dimming so the light holds steady at the low end.
Tell us the rooms, ceiling height, ceiling construction, and whether there is attic access above. We confirm the layout and the circuit before quoting a price.
Access Decides Method
Drawn Before Drilling
JA8 Certified Sources
Driver Matched to Dimmer
Recessed Lighting Services
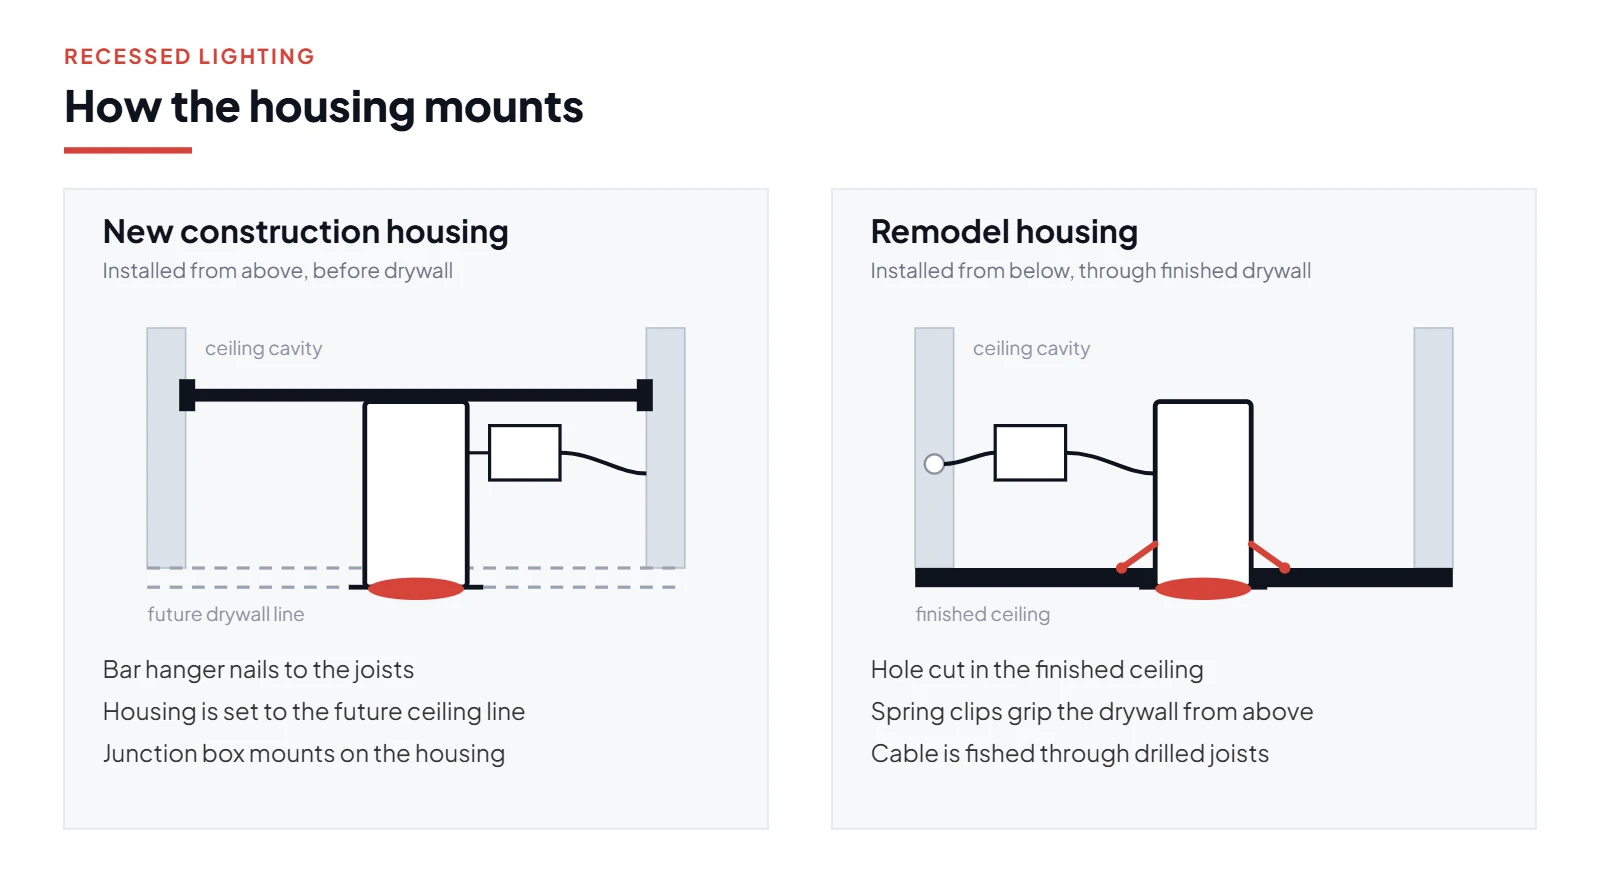
Two housings, two different jobs. A new-construction housing hangs from a bar hanger nailed between the joists and goes in before drywall. A remodel housing drops through a hole cut in a finished ceiling and grips the drywall with spring clips. Access decides which one your ceiling gets.
With an open ceiling or a walkable attic above, running cable and setting housings is straightforward, and the layout limits the fixture count rather than the framing. In a finished ceiling with no access above, a second-floor room, a flat roof, or a dropped soffit, cable has to be fished through the cavity and every access hole patched afterward. Joists, ducts, and fire blocking decide where a light lands.
Both routes end at the same standard. Every housing has to be listed for insulation contact, labeled airtight, and sealed at the ceiling. Our lighting and fixture installation service covers chandeliers, pendants, and track work. Recessed is its own scope because the ceiling becomes part of the job.
POWER ROUTE ELECTRIC RECESSED LIGHTING INSTALLATION
Canless Wafer LEDs
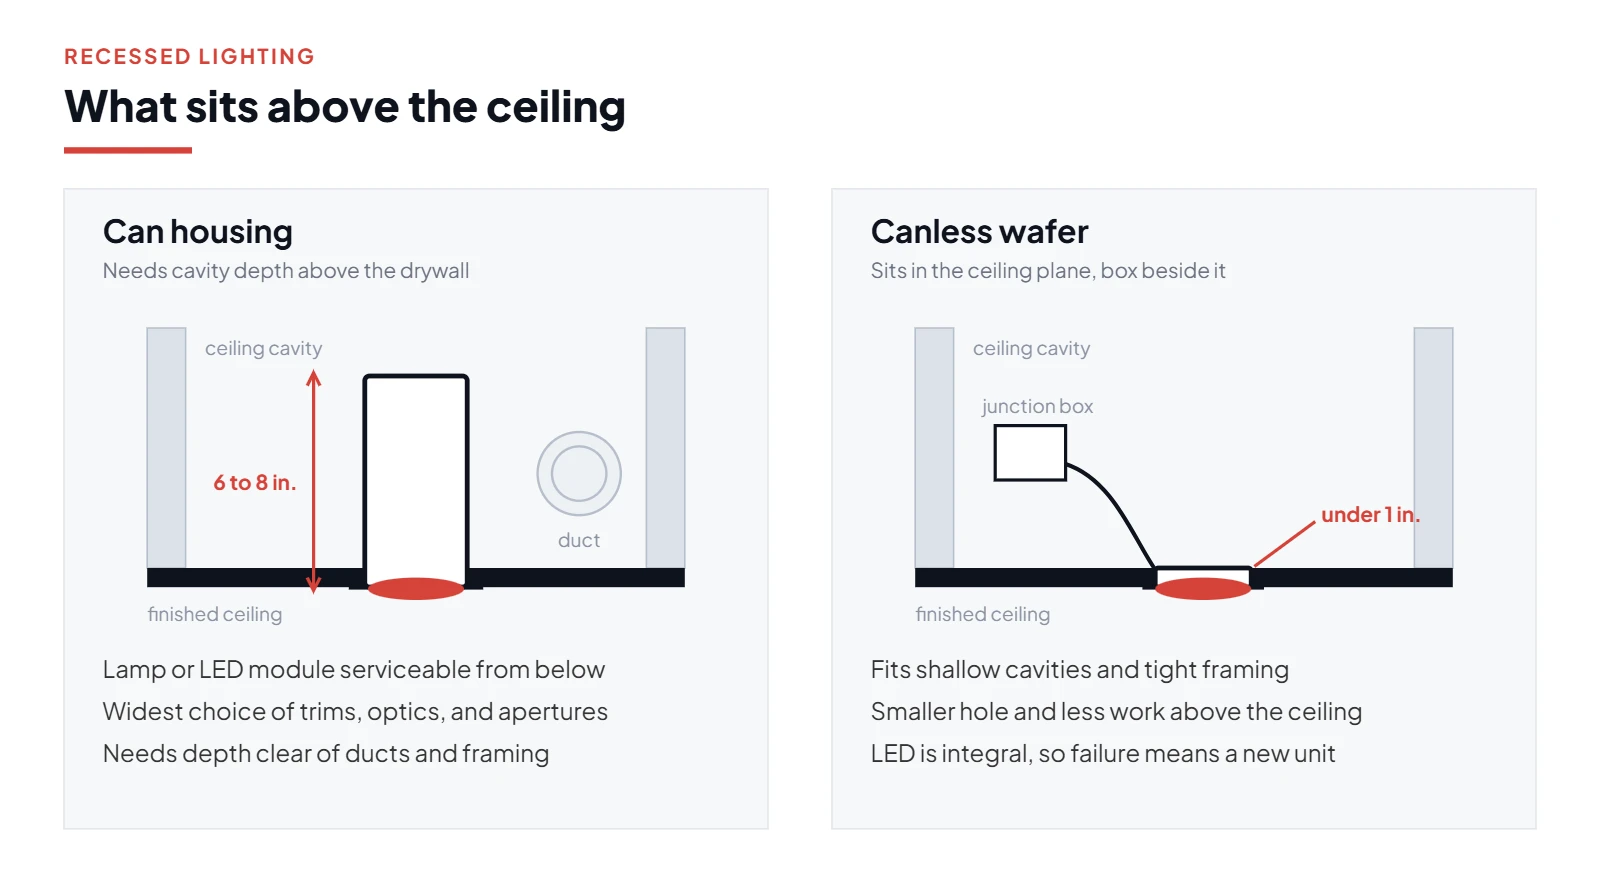
A wafer light is a thin LED disc wired to a separate junction box. Nothing bulky sits above the drywall, so the fixture fits where a can never would: shallow cavities, tight framing, and ceilings crowded with ductwork. The hole is smaller, the attic work is lighter, and the install runs faster.
The pricing effect shows up in retrofits. Rooms once written off because a housing would not fit, or quoted with soffit framing to make room, are now routine. Labor per light drops, and the wafer itself costs less than a housing and trim bought separately.
The trade-offs are real. The LED is integral, so a failed unit gets replaced whole rather than relamped. Trim and optic choices are narrower than a full can system offers. Driver quality varies widely between brands, and a weak driver is where flicker and early failure start. We specify JA8-certified wafers listed for insulation contact, which is what the code asks for anyway.
California Title 24
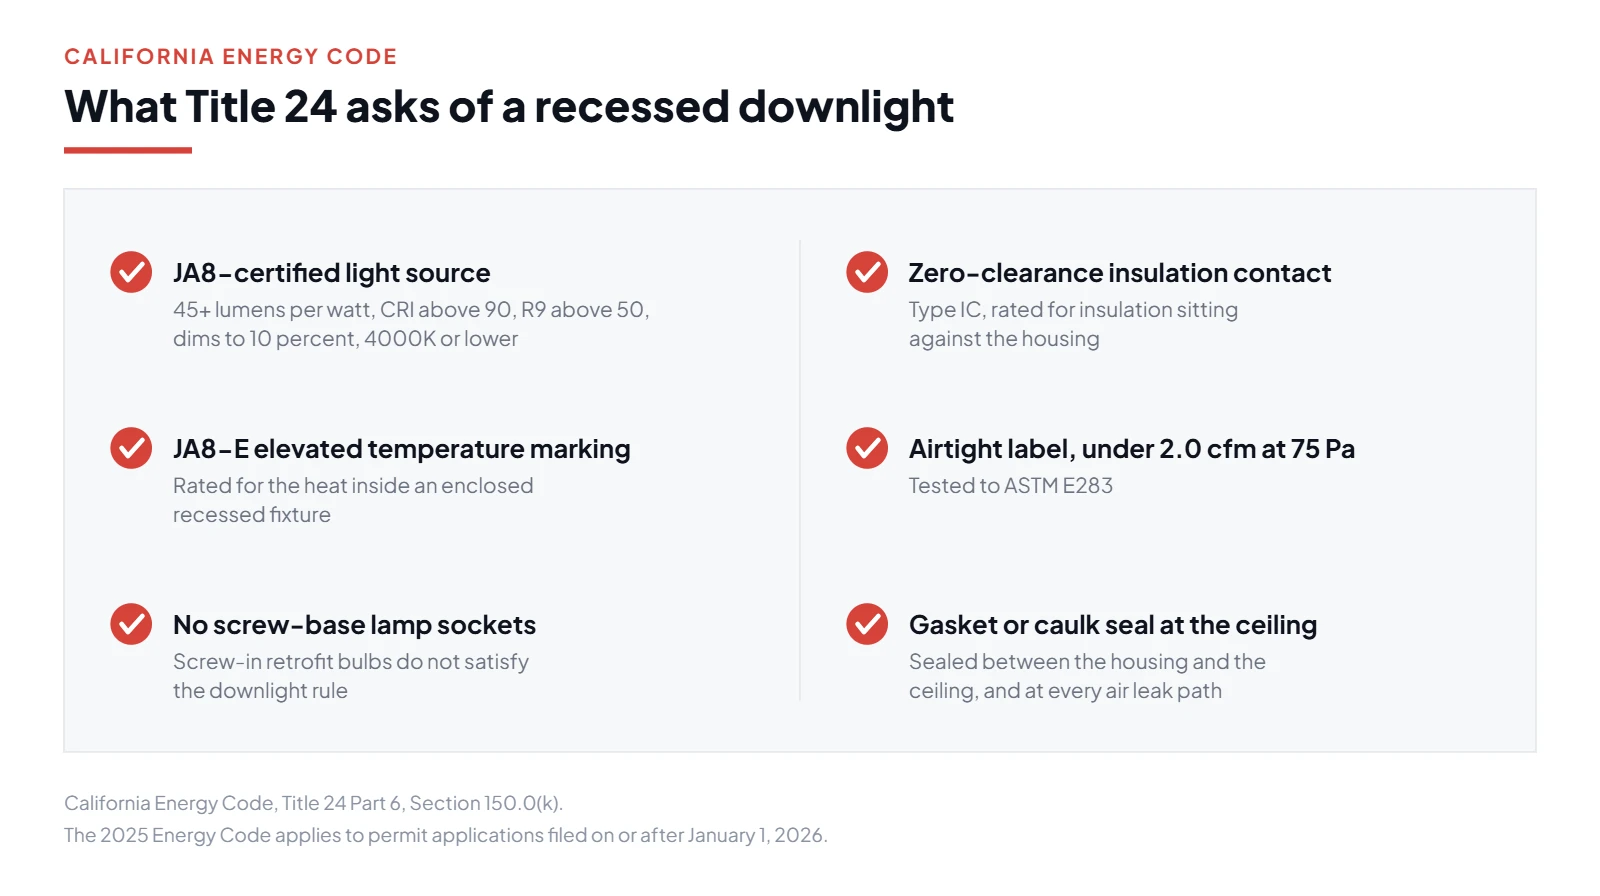
California’s Building Energy Efficiency Standards, Title 24 Part 6, set what lighting is allowed in a home. The 2025 Energy Code applies to permit applications filed on or after January 1, 2026, so current work follows it.
Light sources have to be JA8 certified: at least 45 lumens per watt, a CRI of 90 or higher, an R9 of 50 or higher, dimming to 10 percent, and a correlated color temperature no higher than 4000K. The last item rules out 5000K daylight downlights in a compliant residential install, whatever the box at the home center says.
Recessed downlights carry extra rules under Section 150.0(k). No screw-base lamp sockets. A JA8-E marked source rated for the heat inside an enclosed fixture. A listing for zero-clearance insulation contact. A label certifying air leakage under 2.0 cfm at 75 pascals tested to ASTM E283. A gasket or caulk seal between the housing and the ceiling.
Controls are part of compliance too. Habitable rooms need wall-mounted dimming, and forward phase-cut dimmers controlling LED light sources have to comply with NEMA SSL 7A. Bathrooms, garages, laundry rooms, utility rooms, and walk-in closets need at least one fixture on an occupancy or vacancy sensor. A new branch circuit brings a permit and an inspection under the California Electrical Code, Title 24 Part 3. We pull the permit and meet the inspector.
Attics across Pasadena, Altadena, and the older parts of Los Angeles have been re-insulated more than once, often with blown cellulose or fiberglass poured deep over the joists. The insulation ends up against whatever is already up there, so the fixture listing decides whether that is safe.
A Type IC housing is listed for direct contact with thermal insulation. Anything else has to be kept clear of it.
The California Electrical Code, NEC 410.116, keeps insulation at least 3 inches from a non-IC fixture and recessed parts a half inch off combustible material.
Loose fill migrates. A non-IC housing clear on install day gets buried by the next insulation job, which is how downlights overheat and start cycling on their thermal cutout.
An IC-airtight housing sealed with a gasket or caulk keeps conditioned air out of the attic. Title 24 asks for under 2.0 cfm at 75 pascals.
Most flicker complaints trace back to the dimmer, not the light. A legacy dimmer was built for an incandescent load of several hundred watts. Six LED downlights might draw sixty. Below the dimmer’s minimum load the waveform gets unstable, and the result is flicker, buzz, or a dead band at the bottom of the slider.
Legacy dimmers need a minimum wattage to regulate. LED loads often fall under it, which is why the same fixtures behave on a new dimmer and misbehave on the old one.
Forward phase-cut dimmers suit some drivers, reverse phase suits others. The wrong type is a common source of buzz and drop-out at low levels.
The 2025 energy code requires forward phase-cut dimmers controlling LED sources to comply with NEMA SSL 7A. Reverse-phase and digital dimmers get matched to the driver instead.
We run every zone through the full dimming range on site, at your actual fixture count, and swap the dimmer when the low end is not clean.
Spacing comes off the ceiling height. Multiply ceiling height by a spacing criterion, usually between 0.5 and 1.5, to set the maximum distance between fixtures. On an 8-foot ceiling, general lighting commonly lands 4 to 6 feet apart. Wider reads as spotlights with shadows between them. Tighter washes the room out.
A higher ceiling throws a wider pool, so fixtures spread further apart. A 10-foot ceiling carries spacing an 8-foot ceiling will not.
Start the first row 2 to 3 feet off the wall. Closer grazes the wall and lights the art. Further leaves the perimeter dark and the ceiling bright.
Output matters more than fixture size. A 4-inch LED often delivers what a 6-inch can once needed, so aperture becomes a design choice rather than a light-level one.
Counters, desks, vanities, and reading chairs get their own placement, forward of where you stand, so your body is not between the light and the work.
Recessed Lighting Layouts

A general grid plus a separate run over the counters. Working edges need light in front of you, not behind your shoulders.

Ambient spacing along the long axis, held off the walls so the room reads evenly. Dimming range matters more here than raw output.

Fewer fixtures, warmer light, and placement off the bed. A layout centered on the ceiling usually puts a light straight above the pillow.

One over the shower rated for a damp or wet location, one at the vanity, and a vacancy sensor on at least one fixture as the code requires.

Even spacing along the run with the first fixture close to the entry. Long halls read better with tighter spacing than an open room.

Neutral 4000K light, tighter spacing for task work, and a vacancy sensor in the garage and laundry.
A recessed lighting job runs through the ceiling, the layout, the circuit, and the controls. Here is how the work goes.
Check construction, cavity depth, insulation, attic access, joist and duct runs, existing circuits, and switch locations.
Set fixture count, spacing, aperture, color temperature, and control zones, then confirm the circuit and the permit path before a hole gets cut.
Cut, wire, seal, and trim each fixture, then run the full dimming range, verify sensor zones, and patch what needed opening.
Local Recessed Lighting Installation
PowerRoute installs recessed lighting for homes across Pasadena and the surrounding Greater Los Angeles area. Housing stock changes inside a few miles: post-war ranches with deep attics, 1920s homes with plaster ceilings, and newer builds with shallow cavities and ducted second floors. The ceiling decides the method, so we look before we quote. We serve Pasadena, Los Angeles, Glendale, Burbank, and the San Fernando Valley.
Fixture count and spacing come off the room and the ceiling height, not off a round number picked over the phone.
JA8-certified sources, JA8-E marking for enclosed downlights, and the airtight and insulation-contact listings the code requires.
When a finished ceiling means fishing cable and patching drywall, we say so up front and price the patching instead of discovering it later.
Every zone runs the full range before we leave, at your actual fixture count, so flicker gets caught in the driveway and not at dinner.
Holes cut to the trim, debris contained, and drywall patched where the run needed opening.
New branch circuits get permitted and inspected. We pull it, meet the inspector, and close it out.
Published national cost data puts an installed downlight at roughly $125 to $300 in an existing ceiling, and 40 to 50 percent less in open framing before drywall. A six-light kitchen commonly lands in the high hundreds to low thousands. Those are national figures, and your ceiling moves them more than the fixture price does. A site visit gives a better answer than a flat online number.
Open framing or a walkable attic is the low-cost case. A finished ceiling with no access above means fishing cable and patching drywall.
Each light adds a hole, a connection, and a trim. Spacing sets the count, and the room sets the spacing.
Canless wafers, IC-airtight cans, sloped-ceiling housings, wet-location trims, and selectable-CCT units all price differently.
Tying into an existing circuit costs less than running a new one. Dimmers, sensors, and extra switch legs add material and labor.
Installation Planning
The right installation depends on the ceiling, the room, the circuit, and how the space gets used at night. These are the details we settle before the first hole gets cut.
Drywall over joists, plaster and lath, a concrete slab ceiling, or a dropped soffit each change the method and the patching.
Planning step: confirm construction and cavity depth before choosing between a can and a wafer.
A walkable attic keeps the job straightforward. A second-floor ceiling or a flat roof means fishing and patching.
Planning step: check access above every fixture location, not only at the attic hatch.
4-inch and 6-inch apertures, narrow to wide beams, and adjustable gimbals suit different rooms and ceiling heights.
Planning step: match aperture and beam to the ceiling height and to what the light has to reach.
2700K reads warm for living rooms and bedrooms. 3000K suits kitchens and baths. 4000K reads neutral for garages and work areas. JA8 caps residential sources at 4000K.
Planning step: pick one temperature per sightline, or use selectable-CCT fixtures and set them at the trim.
LED downlights draw little current, so an existing circuit often carries them. Breaker size, existing load, and the switch loop decide it.
Planning step: run the numbers on the existing circuit before assuming a new one is needed.
Dimming in habitable rooms, vacancy sensors where the code asks for them, and zones matched to how the room gets used.
Planning step: set the control zones on the layout, not at the switch box after the fact.
IC-rated, airtight, and gasketed, so the attic stays out of the room.
What sits above the drywall decides where a light lands. The layout gets adjusted, never forced.
Sloped-ceiling housings and adjustable trims aim the light down instead of at the far wall.
Showers, soffits, and exterior eaves need fixtures and trims listed for the location.
App control, scene presets, and selectable color temperature, specified when they earn their place.
Fished runs mean access holes. We patch them and say up front where paint will be needed.
New branch circuits get a permit and an inspection. We handle both.
Read feedback from customers who chose PowerRoute for electrical installations, upgrades, and problem solving.
Trustindex verifies that the original source of the review is Google.
Albert and his whole team is tremendously great. They have done a few different projects for me which were big and small. Each time I have called them they have responded quickly and with more than fair pricing. From pulling electrical permits from the city to installing GFCI receptacles, Albert does it all.Posted on Google
 Jonathan KingAlbert and his team are very professional in how they handle there work and they always provide me with great service for a fair price. But there attention to detail and professional approach to business is what I appreciate most. Albert and his crew are my go too for all electrical needs weather at my business or home.Posted on Google
 Nicko MoukoianGreat team, Albert and his guys always bring me peace of mind!Posted on Google
 Matthew SaadoI haven’t personally hired PowerRoute Electric for their services, but I’ve worked alongside them on several jobs over the past year and a half before it was out to the public. From what I’ve seen firsthand, they take their work seriously. They show up on time, communicate clearly, and put effort into getting the job done right. Their team is respectful and seems to care about doing things the right way, not just the fast way. They’re not perfect—no company is—but they’ve consistently shown up and done what they said they would, which goes a long way in this line of work. If you’re considering hiring them, based on what I’ve experienced working with them on-site, they’re reliable and professional. I’d trust them on a job of my own.Posted on Google
 Jeronimo CorletoI had an excellent experience with Power Route Electric! From the first call to the final installation, their team was professional, punctual, and extremely knowledgeable. They took the time to explain the process, answered all my questions, and completed the work efficiently and neatly. It’s clear they care about quality and customer satisfaction. I’ll definitely be using them again for future projects and highly recommend them to anyone looking for reliable electrical services!Posted on Google
 Mario MarinI highly recommend Power Route Electric ! Very professional and easy to work with. Albert is always going above and beyond for his clients anything you need he will always be there to help ! 10/10Posted on Google
 Cristian AmbrosioI shopped around for the best rate and service to install two generators. I found Powerroute Electric through a friend and have now referred them to 4 of our friends and neighbors. They are amazing and deliver great service and pricing.Posted on Google
 Ken CollisPower Route was fast, efficient, organized and knowledgeable when working on solving my electrical issues. They went above and beyond by giving us a breakdown of what the cheaper option vs the best solution would look like in terms of cost and long term solution. Power Route was very transparent and delivered high quality work . Fixed our flickering lights, our overload issues, provided a water heater solution and installed 2 car chargers. Everything is working great and we have not had an issue. Would definitely recommend.Posted on Google
 Edwin ReynaHad a great experience working with Power Route. Super professional, punctual, and the quality of work was excellent. They explained everything clearly and made sure the job was done safely and efficiently. Definitely my go-to for any electrical work from now on—highly recommend!Posted on Google
 Guillermo Reyna3 EV Charger upgrades and wiring were completed along with Retrofitting of exterior and interior lighting for our campus was recently completed by PowerRoute Electric. Albert and his technicians were extremely helpful and professional from start to finish. Great communication and punctual. They completed the scope of work on time and we’re very neat during the process. Everyone is happy with the improvements and their work! Thank you PowerRoute Electric for making this a seamless process and working around our schedules to minimize classroom interruptions.Posted on Google
 Sig Del toro
Recessed Lighting FAQs
Common questions about layout, fixtures, dimming, code, and cost.
Published national cost data puts an installed downlight at roughly $125 to $300 each in an existing ceiling, and 40 to 50 percent less in open framing before drywall. A six-light kitchen commonly lands in the high hundreds to low thousands. Ceiling access, fixture count, and whether the job needs a new circuit move the total more than the fixture price does. We quote after seeing the ceiling.
Start from the ceiling height. Multiply it by a spacing criterion between 0.5 and 1.5 to set the maximum distance between fixtures, which puts general lighting on an 8-foot ceiling around 4 to 6 feet apart. Hold the first row 2 to 3 feet off the wall. Output matters more than aperture size, so a 4-inch fixture often covers what a 6-inch can once did.
In an insulated ceiling, yes. The California Electrical Code, NEC 410.116, keeps thermal insulation at least 3 inches from a non-IC fixture, while a Type IC fixture is listed for direct contact with it. California's energy code also requires recessed downlights be listed for zero-clearance insulation contact and labeled airtight at under 2.0 cfm at 75 pascals.
Usually the dimmer. Legacy dimmers were built for incandescent loads of several hundred watts, and a row of LED downlights draws a fraction of that, leaving the dimmer under its minimum load. The result is flicker, buzz, or a dead band at the bottom of the range. JA8 sources dim to 10 percent. The 2025 energy code requires forward phase-cut dimmers controlling LED light sources to comply with NEMA SSL 7A, while reverse-phase and digital dimmers get matched to the driver instead. Getting that pairing right fixes most of it.
Yes. Remodel housings and canless wafer lights mount through a cut hole and clamp to the drywall, and cable gets fished through the ceiling cavity. Expect more drywall patching where joists, ducts, or fire blocking interrupt the run, and expect the layout to shift a few inches around framing.
2700K reads warm and suits living rooms and bedrooms. 3000K is slightly cleaner and is the common kitchen and bathroom pick. 4000K reads neutral for garages, laundry rooms, and work areas. JA8 caps residential sources at 4000K, so 5000K daylight downlights are not certified for a compliant California home. Selectable-CCT fixtures let you set the temperature at the trim.
A new branch circuit requires an electrical permit and an inspection under the California Electrical Code. Swapping fixtures on an existing circuit often does not. Requirements vary between cities across Los Angeles County, so we confirm with the building department before work starts and pull the permit when the job needs one.
Often, yes. LED downlights draw little current, so an existing circuit frequently has room. The deciding factors are the breaker size, what else sits on the circuit, and how the switch loop is wired. A dedicated circuit becomes the better answer for a large open-plan layout or a panel already close to capacity.
One room of four to eight lights with attic access above is usually a one-day job. Finished ceilings without access, multi-room layouts, a new circuit, or panel work push it to two days or more. We give you the timeline with the quote.
Send the rooms, the ceiling height, and the ceiling type. We come back with a layout, a fixture count, and a price.